Aug 5, 2013 | Anna's Best Recipes, Desserts & drinks
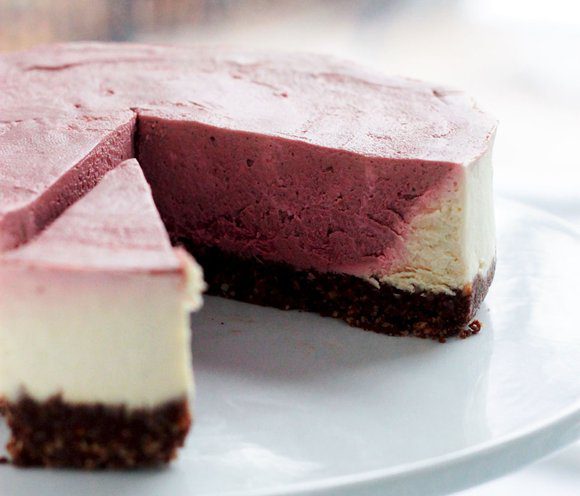
We ate this for dessert last night, and I indulged again after a full breakfast this morning so am sitting here feeling a bit stuffed! This delicious mostly cake is very decadent and has a lot of good-for-you stuff. Technically its not all raw as cashew nuts are steamed after harvesting to make them edible. You can make this up to 5 days ahead if you like. The recipe is adapted from one by Laura Wright but I have reduced the syrups and given you alternatives for those hard-to-find ingredients. I also use cooked beetroot instead of raw, which simply doesnt break up well unless you have a super high speed food processor. Sometimes I make individual servings in mousse rings and store in a box in the freezer. I find that this cake quantity makes at least 10 so sometimes I make half the quantity for a smaller gathering.
It’s really important to use the mousse ingredients at room temperature not straight from the fridge – otherwise it solidifies instantly into an un-pourable mound with a grainy texture. I found out this by experience!!
For 1 x 22cm cake (to serve 10-12):
Remember to check out “larder & shopping” section in this blog for suppliers
Base:
310g raw almonds
30g raw cacao powder
¼ level tsp Himalayan or Atlantic Sea Salt
40g dried sour cherries (or use dried cranberries if you can’t get cherries)
8 medjool dates, pitted
1 tsp vanilla extract
1 rounded tbsp extra virgin coconut oil
Mousse:
325g raw cashews, soaked overnight in filtered water, at room temperature
330ml almond milk, at room temperature
155ml/140g extra virgin coconut oil, gently warmed to a liquid
60ml/4 level tbs/85g raw honey, raw agave nectar or maple syrup, at room temperature (tip: use a hot spoon to measure honey, if using)
Juice of 1 lemon, at room temperature
2 tsp vanilla extract
¼ level tsp Himalayan or Atlantic Sea Salt
115g frozen, pitted cherries (or raspberries if you prefer), thawed, at room temperature – or use pitted fresh cherries if in season
1 small cooked beetroot, chopped, at room temperature (shop bought will do)
1 x 22cm spring-form cake tin
A little extra coconut oil for greasing the tin
A food processor
Cling film (if making ahead and storing in the freezer)
1. To make the base, place the almonds in a food processor and pulse until chopped and resembling breadcrumbs. Add the cacao powder, salt, dried sour cherries, dates, vanilla and rounded tbsp coconut oil and blitz until the dried fruit is evenly distributed throughout the mix. When the mixture holds together when pinched, it’s ready to use. Grease the sides of your tin with a little extra coconut oil or rapeseed oil. Evenly press the base mix into the bottom of the prepared tin and set aside.
2. To make the mousse, remember that all the ingredients need to be at least at room temperature or else the mix thickens too quickly and becomes grainy and unpourable. Drain the cashews and combine them in the food processor with the almond milk, coconut oil, honey/maple syrup or agave, lemon juice and salt. Blend until smooth.
3. Pour all but 500ml (about half) of the mixture into the prepared tin. Add the pitted cherries and chopped beetroot to the remaining 500ml of the mixture. Blend until smooth and pour all but 250ml of this mixture quickly into the centre of the cake. Lightly drizzle the remaining mousse mixture around the top of the cake creating a decorative marbled effect.
4. To set the mousse cake: cover the tin with a plate and place in the coldest (bottom) shelf of the fridge for 6 hours or overnight. Alternatively, stretch cling film over the top of the tin and slide gently into the freezer for 6 hours or overnight. The cake will keep quite happily for a couple of weeks in the freezer. Remove from the freezer to thaw at room temperature for 1-2 hours before serving. When its soft right the way through (test with a needle), place in the fridge until you want to serve.
Dietary note:
Virgin coconut oil is a great source of medium chain triglycerides, a special type of fat that goes straight into energy production in your body instead of being used to make fat. For this reason, it is a healthier fat than butter. Coconut oil also contains capryllic acid, which has anti-fungal properties – good news for anyone with bowel issues or cystitis linked to candida. Cherries, red berries and beetroots are high in proanthocyanadins which strengthen connective tissue and the lining of your digestive system, reducing the tendency to diverticulitis, hernias and saggy skin. Raw almonds (and cold-pressed or “extra virgin” oils) contain vitamin E. This vitamin naturally lubricates and moisturises your skin, reduces the production of wrinkles, and also helps dampen down allergic reactions. Healthy skin does not need body moisturisers. “Raw” cashew nuts are, bizarrely, not raw at all – the nuts have to be steamed in order to be extracted from their hard shell. Cashews are a sweetish and healthier substitute for cream cheese, sugar and other not-so-great ingredients that tend to be used in desserts. Desserts like this one should be used as occasional treats and not eaten at every meal. They are still rich in natural sugars and if you eat them all the time, provide more calories than you need. A normal daily intake of raw nuts and seeds would not exceed a tablespoon or two.
Aug 1, 2013 | Anna's Best Recipes, Sides, starters, soups & snacks
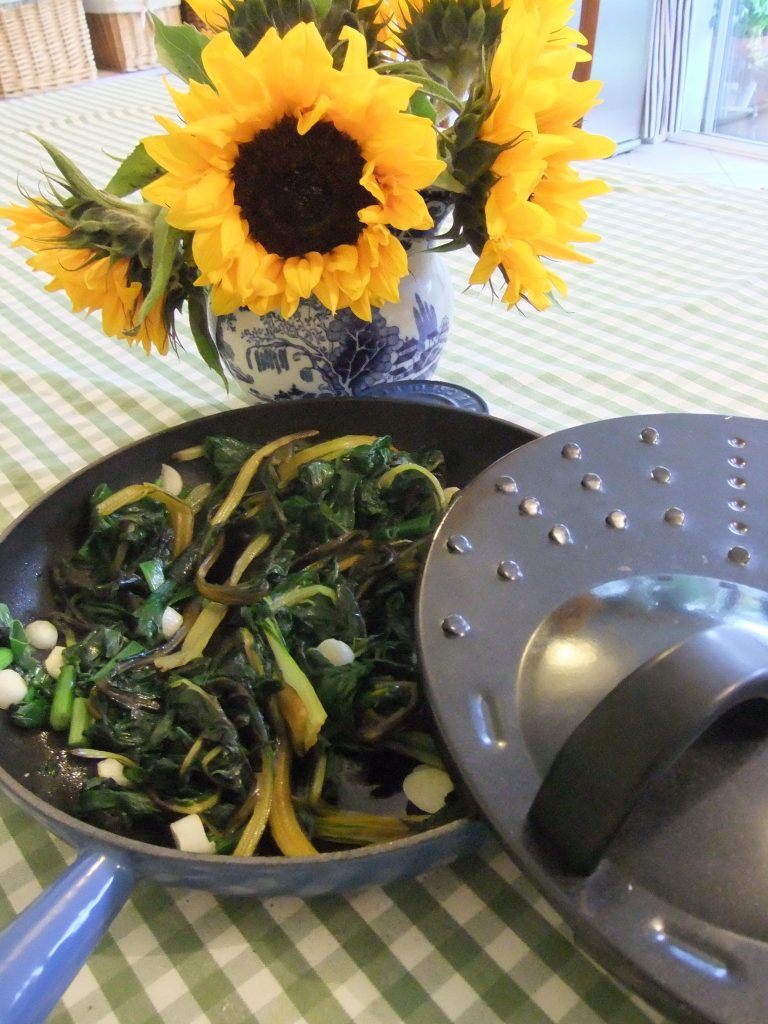
We were once in a rustic trattoria in Puglia where there was no menu. The owner just came out of the kitchen and told you what they were going to feed you. One of the courses was local greens (cima di rape) braised with olive oil and garlic and liberally sprinkled with Parmesan. It was incredibly good. Since that holiday we often cook greens by braising them with olive oil and garlic, rather then steaming. Serve as a side to a piece of meat or fish, or maybe an omelette or a simple piece of smoked mackerel or trout.
1 x 500g bag chard or organic* spinach leaves
3 cloves garlic, roughly chopped into quarters
3 spring onions (optional) cut into 2cm lengths
Extra virgin olive oil
Freshly ground black pepper
Optional (avoid for dairy-free diet): 1 tbs freshly grated Parmesan cheese
1. Put a frying pan (ideally a heavy-bottomed one) on a medium heat, add the garlic and white parts of the spring onion and 1 tbs olive oil. Cover with a lid or plate and cook until softened and slightly translucent.
2. Meanwhile wash the chard/spinach, shake the excess moisture off the leafy greens (don’t dry them completely or they will burn). If the leaves are large, cut into approximately 5cm lengths (across the thick stalks) and add to the pan along with the green parts of the spring onions. Cover and cook gently until wilted. If you use baby spinach or chard this will only take a couple of minutes. If you use larger leaves it can take 10-15 minutes.
3. Eat hot or lukewarm – they will keep warm, off the heat, in the covered pan for quite a while.
Why this is good for you:
First of all why do I stress “organic” spinach leaves? Because spinach is in the top 3 most agri-chamical-contaminated produce. Agri-chemicals like herbicides disrupt both our gut bacteria and our hormonal systems. Our hormonal systems need to work well for energy, motivation, mood, proper thyroid function, freedom from hormone-related diseases and much more. Chard and spinach, because they are dark green leafy veg, are very high in magnesium and folic acid. If you have digestive disorders, acne, psoriasis, or eczema, or if you are stressed, you could need more of these nutrients. Folic acid and magnesium are essential for liver function and mental health. Most Irish people are deficient in magnesium because don’t eat enough magnesium foods and we eat and drink things that deplete it from your body – coffee, sugar, refined foods, for example. Stress also depletes your nutrients. Celtic people also often have altered folic acid metabolism. This genetic issue may predispose us to alcoholism and depression.
Aug 1, 2013 | Anna's Best Recipes, Desserts & drinks
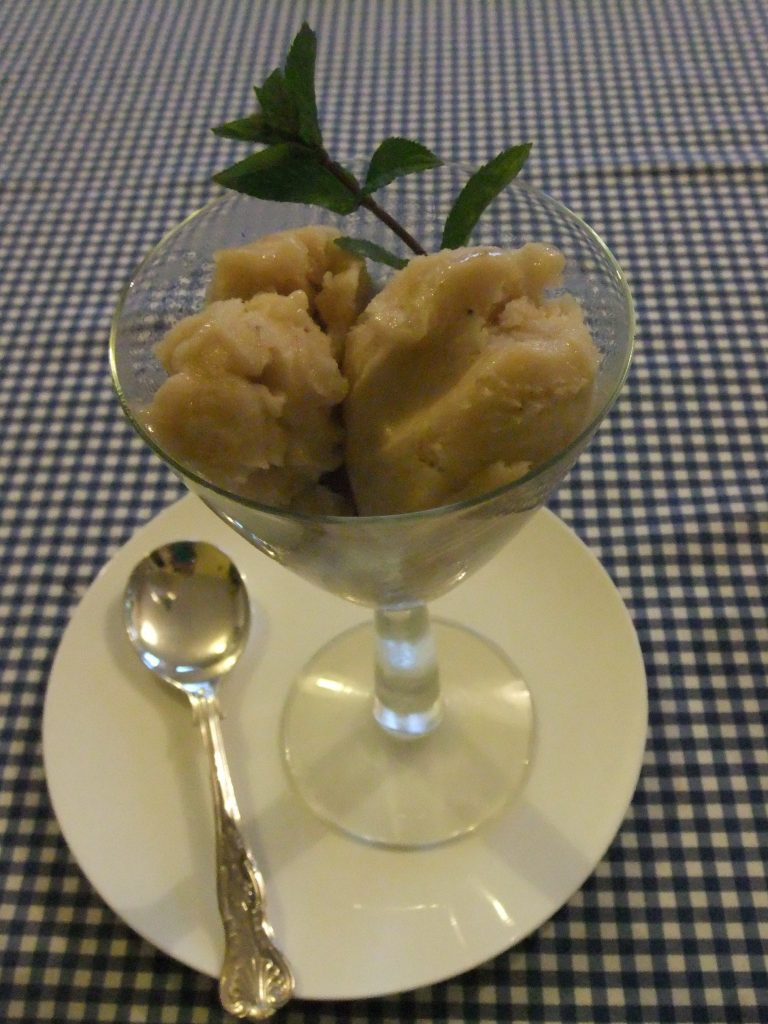
Last night we ate scoops of this creamy, delicious banana ice piled in chilled cocktail glasses. Its incredibly simple to make but totally delicious. The recipe is adapted from one in Agnes Marshalls Book of Ices which came out in 1885. This is very sweet even when made with lemons. Children love it.
Serves 6 (allowing 2 scoops per person)
6 ripe bananas (with spots)
100g xylitol/erythritol
300ml water
The juice of 2 oranges or lemons
A blender/food processor, and (if you have it) an ice cream maker
1. If using an ice cream maker, turn it on to start chilling straight away. This takes at least 10 minutes.
2. Place all the ingredients in a food processor or blender and puree well.
3. Now either freeze the mixture or churn in an ice cream maker until solidified (this takes around half an hour). Eat immediately or store in the freezer. If you don’t use an ice cream maker, then removing the mix from the freezer after an hour and beating it with a whisk before replacing in the freezer will make it creamier. Its not vital, though.
4. To serve, remove from the freezer for half an hour to soften. If you have a metal ice cream scoop, dip it in a jug of hot water between scoops to achieve perfectly-shaped scoops (I was in a hurry, forgot to boil the kettle, and didn’t bother, which is why the photo above looks a bit too rustic…).
Why this is good for you:
Bananas are a rich source of fructo oligo saccharides (FOS for short), which help feed beneficial bacteria in your gut. Xylitol is a healthier alternative to standard sugar as appears not to deplete nutrients and has a much lesser impact on blood sugar levels. Even diabetics can eat xylitol. Fresh lemon juice is high in health-boosting antioxidants and is supportive of liver function – good news if you want to balance hormones, enhance energy or have perfect skin. If you want to avoid upsetting blood sugar levels (bananas are a high sugar fruit), eat this ice as a dessert after a protein meal or eat some protein/healthy fats alongside. A dollop of Coyo or Abbot Kinney’s dairy-free yoghurt (from health stores) would be a good thing to top this. Or sprinkle 1 tbsp of gently toated almond flakes on top before eating.
Jul 30, 2013 | Anna's Best Recipes, Breakfasts & smoothies, Main courses
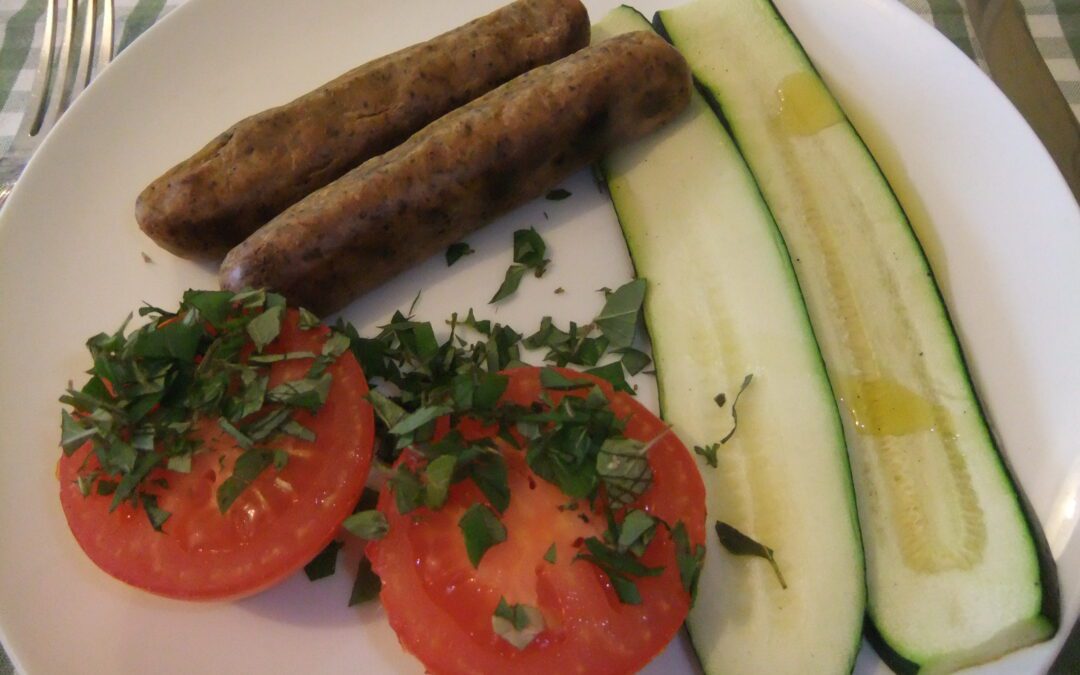
This was one of my favorite breakfasts on a weekday when I didn’t have that much time and I didn’t have to be gluten-free. Now that I know I’m coeliac I use the gluten-free alternatives mentioned below. Cooking in the oven makes it handy, because (unlike grilling) you don’t have to watch it every minute. These Taifun brand sausages are vegan and contain 11% protein so are great for keeping you satisfied for longer. Check out my “larder” on the menu for where to buy these and other unusual foods. Make sure you get the “grill herb sausages” though, they are the nicest. These sausages are not gluten-free as they contain soya sauce and small amounts of oats (which can be contaminated with gluten grains). For the gluten-free option, see the Taifun Basil Tofu option below in the recipe. You could also eat this for a light lunch or dinner. All the Taifun products keep for ages in the fridge.
For 1 person:
1 tomato
1 medium courgette
2 Taifun grill herb sausages (these contain gluten, for gluten-free- slice 1/2 a block of Taifun Basil Tofu or Tofu Rosso into 3 thick slices instead)
Extra virgin olive oil
1 tsp dried oregano or 1 tbsp chopped fresh oregano
Freshly ground black pepper
- Put the sausages on a baking sheet in the oven and switch on to 170C (or 150C in a fan oven). Wash the courgette and tomato. Halve the tomato and slice the courgette lengthways – sliced 1/2-2/3 cm thick is just about right, I think.
- Leave the sausages to cook in the heating-up oven for around 25-30 minutes while you shower or generally get ready for the day.
- After 25 mins remove the baking sheet from the oven. The sausages or basil tofu should be swollen up and slightly coloured now. Add the courgette slices and tomato halves and pop into the oven for another 5 minutes. This way the veggies will be hot but not mushy. They will retain lots of nutrients this way.
- Arrange everything on a plate, drizzle a teaspoon of olive oil over the courgette slices, sprinkle the oregano over the tomatoes, and add a few good grinds of black pepper. Why this recipe is good for you:
The oregano and tomatoes in this recipe are packed with antioxidants that help your health – by lowering inflammation, delaying ageing, and (in the case of oregano) inhibiting the growth of pathogenic (“bad”) organisms in the gut. Research suggests that unfermented soya products (eg soya milk, textured soya vegetable protein) are not likely to be helpful to health whereas traditional products that are fermented (fermented tofu, tempeh, miso, natto) have lots of evidence to support usefulness in adult hormonal health, especially in relation to breasts and prostate. Fermented soya products are an excellent source of high-quality protein to keep you feeling fuller for longer. If you have autoimmune conditions though, you may need to avoid soya products.
Jul 30, 2013 | Anna's Best Recipes, Desserts & drinks, Sides, starters, soups & snacks
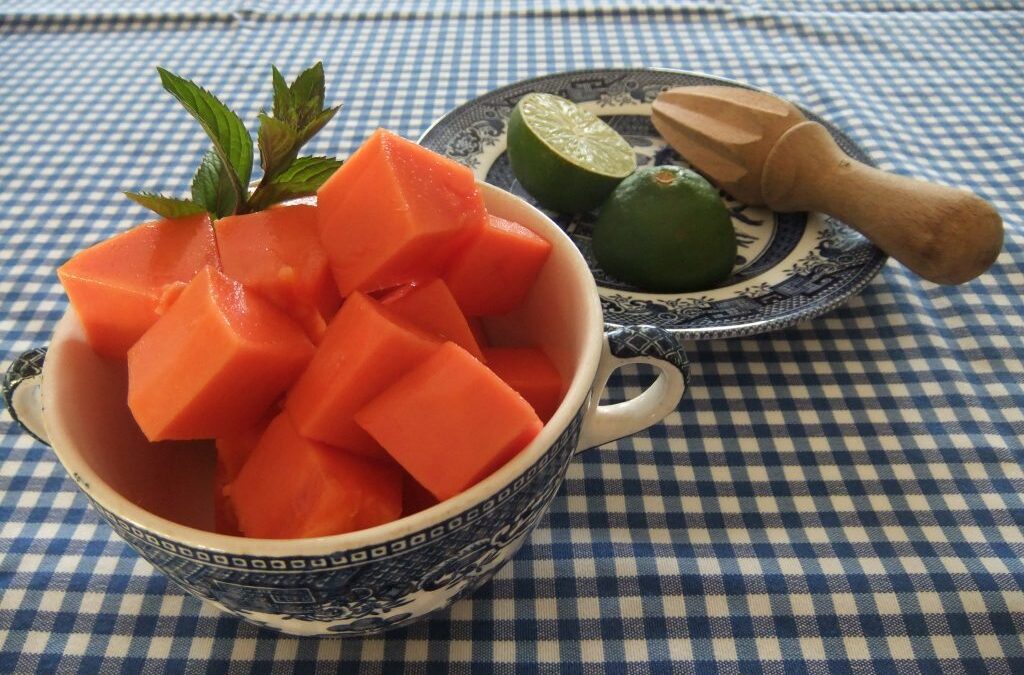
Last weekend I craved some fresh, gorgeous, ripe papaya so we visited the Asia Market in Dublin 2 where we picked up an enormous specimen for about €7. We cut about a third off, scooped out the spherical black seeds, peeled the section with a potato peeler, and cubed it before piling it into bowls and drizzling with lime juice. The rest we kept in the fridge for the next day, and the next. A real taste of southeast Asia. This is the simplest dessert in the world after a weekday dinner. If you wanted to make this into a snack, serve a cupful of papaya pieces with a heaped tablespoon of delicious (dairy-free) Coyo coconut “yoghurt” from health stores. I get my Coyo from Ennis butchers in Inchicore who also sell great meat and fish, and from Nourish health stores.
1 ripe papaya (you will want enough to make 2 teacupfuls of bite-sized cubes)
1 lime, cut in half
1. Peel and scoop out the seeds of a piece of papaya large enough to yield 2 cupfuls
2. Pile into 2 bowls and hand around a lime half to drizzle over. Delicious.
Why this is good for you:
Papaya contains the enzyme papain, which helps digest protein. It’s often in digestive enzyme supplements. Papaya eaten as a dessert after a meal of fish, eggs, meat, or beans helps you digest the meal. Papaya also has anti-inflammatory properties and is rich in minerals.
Jul 28, 2013 | Anna's Best Recipes, Sides, starters, soups & snacks
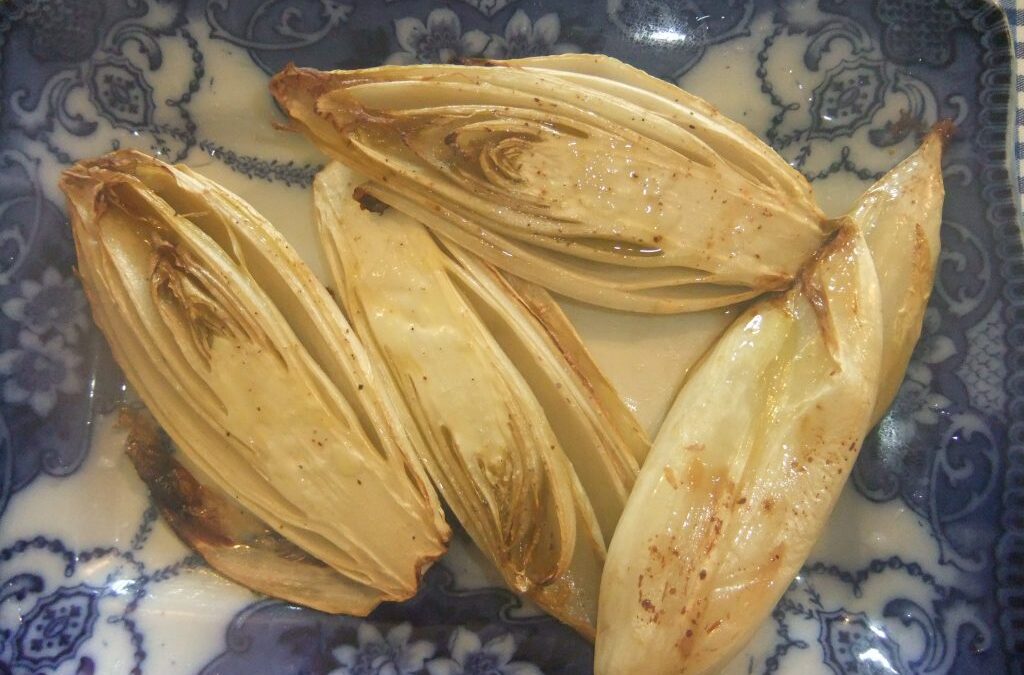
I dreamed up this easy way with chicory this evening, to go with slow roast free-range pork. We also had my braised sliced courgettes alongside, which I will post shortly. The lovely bitterness of chicory cuts the fattiness of the pork, helping you digest it. You could also serve this as a starter, with a sprinkling of parmesan, or a tablespoon of chopped, raw walnuts.
For 2:
2 medium heads of chicory, treviso, or radicchio, rinsed, then halved lengthways
Extra virgin olive oil
Freshly ground black pepper
A pinch of Atlantic sea salt or Himalayan salt
Optional: 2 DSP freshly grated parmesan cheese (avoid for dairy-free)
- Preheat oven to 200C (fan 185).
- Place the chicory in a roasting tin, cut side up, and drizzle over about a dessert spoon of extra virgin olive oil.
- Roast for 15-20 minutes in the oven until wilted.
- Serve with a few good grinds of black pepper, a pinch of salt, and another drizzle of extra virgin olive oil. If you are feeling decadent, sprinkle a teaspoon of freshly grated parmesan over each half.
Why this is good for you:
Chicory, radicchio, and treviso are examples of foods that help you to digest a fatty meal. This is because their bitterness stimulates the flow of bile and digestive enzymes from your gallbladder. This helps break down (emulsify) fat into tiny droplets, which can then be digested all the easier by the digestive enzymes made in your pancreas and also in your small intestine. Other foods/drinks that do the same thing include dandelion coffee, dandelion leaves, rocket, and bitter apple sauce made from cooking apples.
Jul 25, 2013 | Anna's Best Recipes, Dressings, rubs, spreads, sauces & more
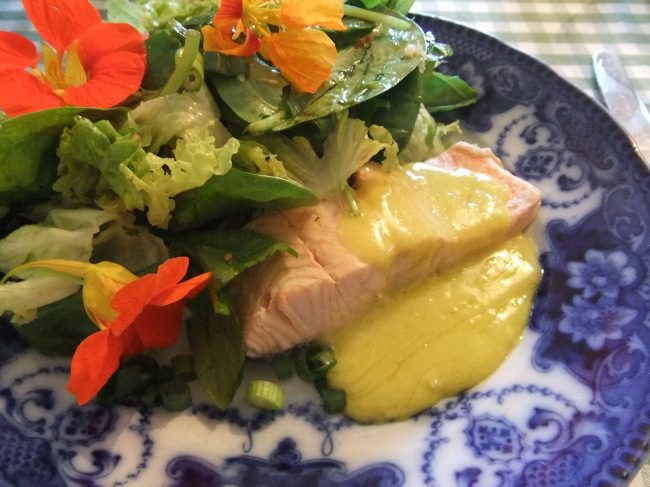
This is a traditional southern French garlic mayonnaise at its best. Always makes me think of holidays. The other day I ate a generous dollop on some poached salmon with a large salad with nasturtium flowers from the garden. Aioli is fantastic with poached or baked fish, cold meat, or hard-boiled eggs in a salad. If you like a more neutral-tasting mayo, you can use equal parts olive and a second cold-pressed (extra virgin) neutral-tasting oil such as sunflower or rapeseed. Do not use refined (non-cold-pressed) seed/nut oils as they are damaging to health. Aioli will keep for about 5 days in a glass jar in the coldest part of the fridge. The garlic helps preserve the raw eggs. It’s quicker to make aioli using an electric whisk than with the pestle and mortar. But don’t try to make it in a blender because it never thickens up for me using one!
For 4 servings:
3 cloves garlic
1 organic egg yolk, at room temperature (this helps the mixture not to “split” or separate)
150ml (approx) extra virgin olive oil (or half olive oil half raw cold-pressed sunflower or rape oil), also at room temperature
A pinch of Atlantic sea salt or Himalayan salt (optional)
You will need:
A pestle and mortar and/or an electric whisk
Pestle and mortar method:
- Peel the garlic, slice into slivers, and pound to a paste with a pinch of salt, add the egg yolk, and mix in. Pounding the garlic gives a different (and in my opinion, subtler) flavour from just crushing it with a garlic crusher.
- You can now either continue making the aioli with the pestle and mortar or (for less work) transfer the garlic/yolk mix to a bowl and get out your electric hand whisk before starting to add the oil as follows:
- Beat in the oil, at first drop by drop, and then, as the mix begins to thicken and resemble mayonnaise, add more liberally but never in a heavy stream. It is ready when it looks thick and creamy. See below for instructions on what to do if it goes wrong.
Electric whisk method:
1. Crush the garlic (with a garlic crusher if you have one, otherwise crush with the back of a knife, using a pinch of salt to really grind up the garlic). Add to a bowl.
2. Add the egg yolk and whisk with an electric whisk for a minute.
3. Beat in the oil, at first drop by drop, and then, as the mix begins to thicken and resemble mayonnaise, add more liberally but never in a heavy stream. If you add it too quickly the mixture will split and never thicken. It is ready when it looks thick and creamy.
To rescue “split” aioli:
Get a fresh (room temperature) egg yolk and start beating it. While beating, VERY gradually and a drop at a time, start adding in the “split” mixture as if it were just oil. Very gradually incorporate the split mixture into the egg yolk, beating continuously, until you have a thick, creamy aioli.
Variations:
Add the zest of an organic lemon and 1 tbsp fresh lemon juice to room-temperature aioli (if it’s not at room temperature, adding the lemon juice will make it split). Mix well. You could also add 2 tbsp chopped parsley too.
Why this is good for you:
Cold-pressed raw oils are fantastic for your health! The raw oils from sunflower, rape, and sesame are rich in polyunsaturated omega 6 oils, while extra virgin olive oil is high in monounsaturated oils and vitamin E, a powerful antioxidant. Omega 6 is fine in small amounts whereas you can enjoy unlimited extra virgin olive oil. These oils can help weight management, enhance skin health and also moisturize your skin from within. You will need to keep raw cold-pressed nut/seed oils in the fridge as they are fragile and easily go off, losing their health benefits. Refined or fried oils (all supermarket oils except extra virgin olive and cold-pressed rapeseed oil and extra virgin coconut oil) disrupt hormone balance and contribute to weight gain and visible aging. Studies have shown people lose weight when they ADD extra virgin olive oil (and raw nuts) to their diets! High-quality oils make you feel fuller longer. Never cook with polyunsaturated oils, only use them raw and cold-pressed.
Jul 22, 2013 | Anna's Best Recipes, Main courses
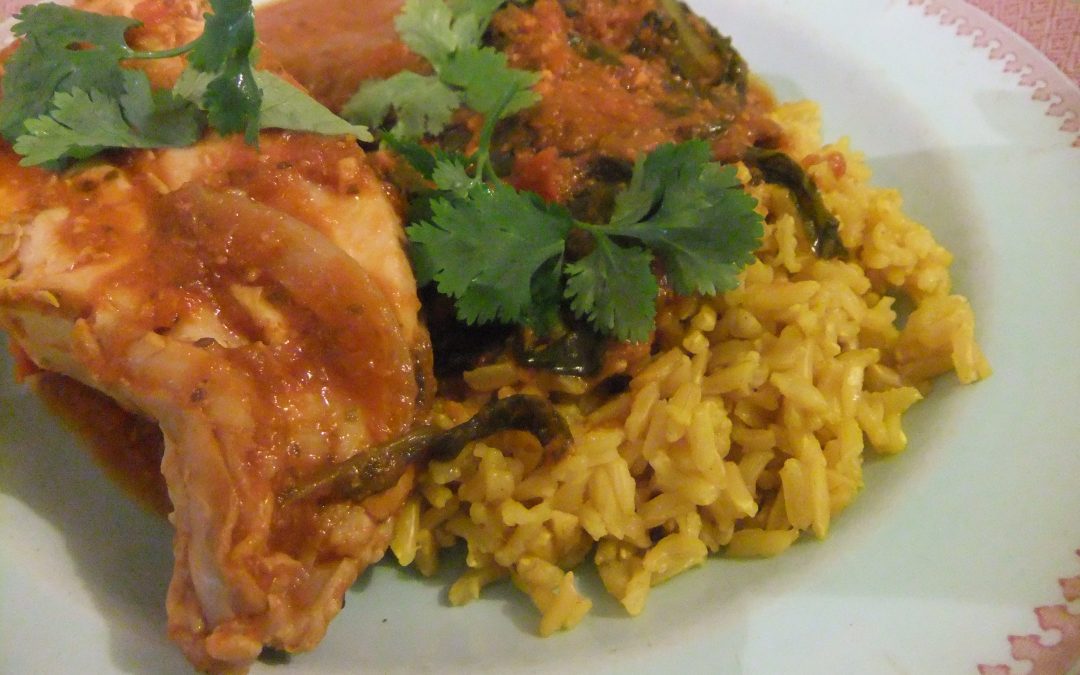
Tonight, we ate these gorgeous chicken pieces. Instead of the roast Mediterranean veg in the recipe, we piled them onto a bed of baby spinach leaves alongside green beans dressed with lemon juice, black pepper, and a little Himalayan salt. If you don’t want to lose any weight, you could add some potatoes. This way of roasting chicken pieces is a real crowd-pleaser.
The paste keeps for a couple of weeks in an airtight jar in the fridge. The chicken is even better if you let it sit in the paste for a while or overnight in the fridge. It’s still great if you slather it on just before cooking. Using a miniature food processor gives a really creamy texture to the paste and saves lots of effort.
For 2
2 whole chicken legs, small breasts on the bone, or fillets, ideally organic.
2 whole red or yellow peppers, washed but not cut open
2 large fat courgettes
A few small/medium sized sweet potatoes or normal potatoes in their jackets (optional – omit if this is your evening meal and you want to lose weight or if you are following a ketogenic eating plan)
2 red onions (optional)
Garlic-spice paste:
12 large cloves garlic, peeled
3 tbsp extra virgin olive oil
1 lemon, juiced
1 level tsp ground cinnamon
¾ teasp ground allspice
¼ teasp freshly ground black pepper
A good pinch of cayenne pepper
1. Preheat the oven to 200C/400F/gm 6
2. Blitz all the spice paste ingredients together in a small food processor. Otherwise crush the garlic and mix well with the other ingredients – the sauce will not cling so well but is still fine.
3. Slather enough of the paste on the chicken to coat well and place in a large roasting dish (you will have a fair bit left over to drizzle over baked sweet potatoes, to use another time to grill some white fish, or to serve as a spicy accompaniment )
4. Prepare whatever vegetables you are using: Wash the peppers (do not cut anything out as, cooked whole, the pepper will fill up with delicious sweet juices while cooking); wash the courgettes and cut into 7cm lengths;
Scrub the potatoes if using. Peel and halve the red onions if using and brush with a little olive oil
Spread out the veg in a single layer with the chicken in the roasting dish.
5. Bake for 50 mins in the oven or until the chicken juices run clear when the meat is pierced with the point of a knife. Chicken fillets may cook faster if they are small so check these after 30 mins (remove from the oven if done while the rest of the veg finish cooking).
Cook’s Tip for Kids Eating:
Many children dislike seeing seeds so try halving the peppers, removing the seeds and in each pepper place a tomato half and a teaspoon of olive oil before putting in the oven. This helps the pepper avoid drying out.
Dietary note:
Garlic and spices in your diet are a fantastic health booster – for liver and skin health, immunity and delaying the effects of ageing. If you cannot source organic chicken then its best to avoid fattiest part of the bird (legs, thighs, skin) and eat only the breast. Battery chickens are routinely dusted with pesticides which congregate in the fatty tissues of the bird.
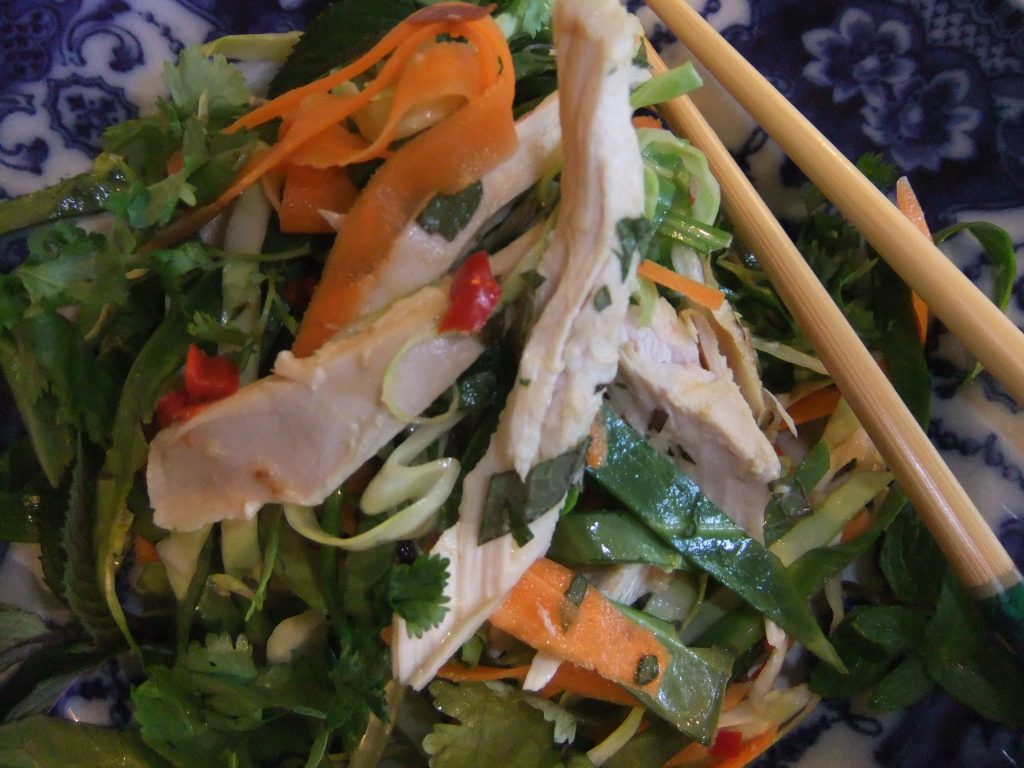
Jul 19, 2013 | Anna's Best Recipes, Main courses
We made this on Wednesday night using leftovers from the pot roast chicken we cooked on Monday. We doubled up the quantities so as to have effortlessly packed lunches the following day. Spouse was ravenous so I cooked an extra 60g of brown rice noodles (which I dressed with a little tamari sauce and a teaspoon of cold-pressed sesame oil) for him as a side. This recipe is suitable for a ketogenic diet if you omit syrup, coconut sugar, or xylitol. If you have a problem with raw onions, try soaking them in the dressing for 20 minutes before adding the other ingredients, this takes the heat out of them.
For 2:
160g cooked chicken (organic if possible), shredded or sliced
4 cups raw, shredded cabbage red, white or green
1 medium carrot, cut into strips with a potato peeler or julienned (in thin matchsticks)
3 spring onions, including green part, cut into long thin strips OR 1/2 a medium/large red onion, halved, then sliced thinly
2 tbsp coarsely chopped or torn mint leaves
Mint and coriander sprigs to garnish
Dressing
1 tbsp fresh lime juice
1 tbsp oriental fish sauce
1 tsp white wine vinegar or rice vinegar if you have it
1 crushed clove garlic
1 DSP coconut sugar, agave or maple syrup, or xylitol (optional) (omit for ketogenic diet)
1 tbsp cold-pressed (virgin) sesame/peanut/sunflower/macadamia/rapeseed oil (if you cannot get any of these as the cold-pressed oil, do not use any oil at all)
1 red chili, de-seeded and finely chopped (optional)
1. For the dressing: put the lime juice, fish sauce, vinegar, garlic & coconut sugar, syrup or xylitol, oil, and chilies in a bowl and whisk so the sugar/xylitol dissolves. Leave for 30 minutes for the flavours to develop.
2. Mix in the salad ingredients and divide between 2 plates or bowls.
3. Garnish with mint and coriander sprigs.
If this is your evening meal and you’re not wanting to lose weight, serve with brown rice or 100% buckwheat or brown rice noodles sprinkled with a little Tamari sauce (from Asian shops). Omit noodles for a ketogenic diet.
Dietary note:
Tamari is a delicious, naturally gluten-free soya sauce, and buckwheat and brown rice are naturally gluten-free too. Cabbage contains folic acid and cabagin which are both very healing for the digestive system, especially if you have gastritis or ulcers. Surprisingly, chilies can have a pain-relieving effect on ulcers and are used in ayurvedic medicine as an ulcer treatment. The virgin, cold-pressed nut and seed oils mentioned in the recipe, eaten raw, are a rich source of omega 6 essential fats. Essential fats are needed for clear skin, digestive wellness, and energy production. Trans fats, generated during standard (non-cold) processing of oils and also during cooking, are harmful. They damage the body and block essential fat utilization. Herbs and spices are high in antioxidants for many health benefits. The reason some people do not tolerate raw onions is they relax the esophageal sphincter. This is the valve that stops food from coming back up towards your gullet. If you have acid reflux, it means that this valve could do with being strengthened by specific dietary measures.