
Sep 10, 2013 | Anna's Best Recipes, Desserts & drinks
This
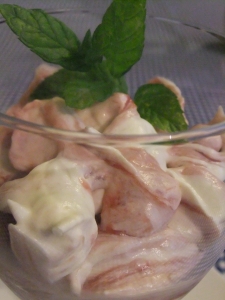
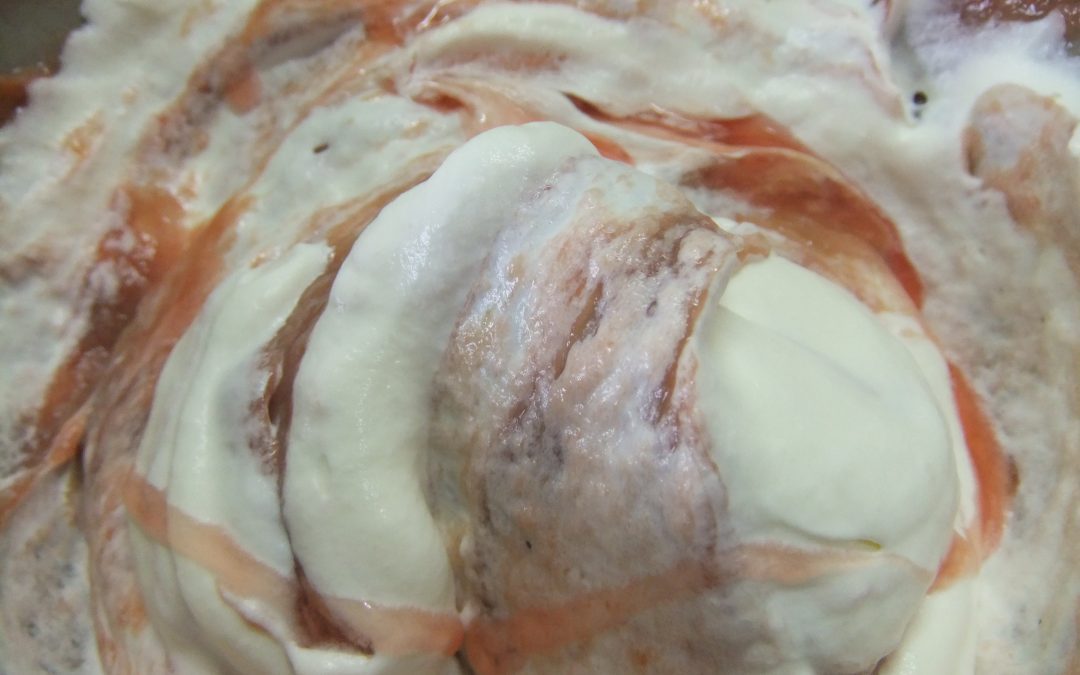
is amazing!! I adapted it from Nigella’s recipe based on traditional dairy cream, which isn’t tolerated well by many dairy-sensitive people. I’ve been working for some time on a dairy-free version of cream and now I think I’ve cracked it – the result has that lovely “mouth-feel” and thickness you get from whipped cream and it’s really good for you too. The straining of the rhubarb and boiling down of the liquid to a syrup means that when you eventually fold everything – rhubarb, cream, syrupy juice – together, you can get a lovely swirled effect. Use the rosiest, pinkest rhubarb you can find. I couldn’t get pink rhubarb so I got a pink colour by mashing and straining a cupful of thawed freezer raspberries to give me 25-30ml of puree. Alternatively, use a few drops of cochineal*, a natural pink food colouring, to make the rhubarb pink. If achieving the pink colour is too much of a faff, don’t bother…
You can also see my “quick dairy-free rhubarb fool” recipe for a simplified version.
For 6
1 kg rhubarb, trimmed and coarsely sliced
4 heaped tbs xylitol*
2 teasp vanilla extract*
Optional: 1 cup frozen raspberries thawed in a sieve over a bowl to catch the juice (if the rhubarb you have got is not the pink stuff then this helps you achieve that gorgeous pink colour but you don’t have to bother) OR about 30 drops of cochineal*
400g tub Coyo plain coconut yoghurt*
400g tub natural unflavoured soya yoghurt* or almond-based yoghurt (e.g. Abbot Kinney’s0
Optional: 4 sprigs of mint to decorate
*Check out my “larder & shopping” section for where to buy all unusual ingredients
- Preheat the oven to 190C. Mix the rhubarb and the xylitol together in an ovenproof dish. Don’t add water. Cover with foil or a tight fitting lid and bake for 45-60 minutes until the fruit is completely soft.
- Meanwhile, if using raspberries for that lovely pink colour, set aside and keep any raspberry juice that has drained through the sieve. Then puree the berries by pushing through the sieve with the back of a spoon. Discard the seedy pulp and reserve the puree.
- Drain the rhubarb in a sieve, reserving the juice. Pour the rhubarb into a liquidiser or food processor (or beat with a wooden spoon for a more rustic texture). Add the raspberry puree if using, 1 tsp vanilla extract and process or beat until smooth, adding more xylitol if needed. Chill this mixture. Put a large bowl (for whipping your Coyo and soya yoghurt) in the fridge as you get a better effect if everything is very cold.
- Pour the reserved juice from rhubarb and the raspberries (if using) into a saucepan. Heat and let bubble away until reduced by about half. Pour into a jug and leave to cool. Don’t refrigerate in case the juice crystallises and loses its lovely pink clarity. You should now have: a pink coloured rhubarb puree and a small jug of thickened cooled syrupy juice.
- Now empty the 400g tub of Coyo, 8 rounded tbs of natural soya yoghurt and 1 tsp vanilla extract into the chilled bowl. Whisk until it’s well mixed and lump-free. Carefully fold in the rhubarb puree, then some of the reduced juice, so the mixture is streaked and marbled. Pile into 4 glasses and, if you have some mint, place a sprig on each. Refrigerate until needed.
Why this recipe is good for you
Using xylitol instead of sugar means you are not releasing vast amounts of sugar into your bloodstream by eating this dessert. Xylitol is safe for diabetics for this reason. Amazingly, sugar is much more harmful for your heart then cream. It is not cholesterol per se, but the oxidisation of cholesterol, that damages arteries. Sugar increases oxidation, ageing and inflammation. So if you want a healthy heart, reducing sugar is a major key. We now eat much less saturated fat than 50 years ago and yet heart disease has skyrocketted. Sugar also depletes the B vitamins. B vitamins folic acid, B6 and B12 are needed to keep artery-damaging homocysteine at low levels. See “larder & shopping” for details. People with cholesterol levels ABOVE the medical ideal are at hugely REDUCED risk of Alzheimers. Shocker. If you would like to read more about this send me an email via the website or give me a call.
Sep 4, 2013 | Anna's Best Recipes, Cakes, biscuits & bars, Sides, starters, soups & snacks
I adapted this recipe by Xanthe Clay and the result was lovely – and easy to make. They are cooked in a frying pan rather than an oven, stick together really well and have a slight crunch. Unlike “normal” sugar, molasses is unrefined so still contains many nutrients. It has a sort of toffee flavour and can be a great choice for kids as it’s high in iron. Using the sunflower and pumpkin seeds raw at the end rather than toasting them on the pan will increase the nutritional value of the bars further but there will be a bit less crunch. Use organic ingredients where possible. Delicious as a snack or lunchbox filler.
Makes 24 small squares
25g gluten-free porridge oats* (or use normal porridge oats if you can eat gluten)
85g virgin coconut oil
55g sesame seeds
55g sunflower seeds
55g pumpkin seeds
85g dried chopped unsulphured* apricots, blueberries, raisins or sultanas
85g raw cane molasses
* Check out my “larder & shopping” section for where to buy all unusual ingredients
1. Line a baking tin around 27x18cm with silicone/baking paper cut to size
2. Heat a large frying pan and add the oats, sesame seeds, sunflower seeds and pumpkin seeds. Cook for about 10 minutes, stirring often at the beginning but more or less continuously toward the end to stop the mix burning. Its ready when you can hear the sesame seeds starting to pop and see the oats beginning to turn golden.
3. Tip into a ceramic or metal bowl or saucepan to cool and mix in the dried fruit.
4. Put the coconut oil with the molasses or honey in a saucepan. Heat the pan gently until the butter/coconut oil melts – do not allow to bubble.
5. Pour contents of the pan into the oat mixture. Stir until all the dry ingredients are well coated.
6. Tip the mix into the tin. Press down very firmly (it helps to put another sheet of non-stick parchment on tip). Allow to cool and then cut into 24 small squares or rectangles. Store in an airtight container for up to 10 days. After that, they tend to soften but can be firmed up by putting them on a baking sheet in the oven set to 160C and cooking for 15 minutes.
Why this is better for you:
If you are starting to convert your children (or yourself) from a high sugar diet then over time you can reduce the quantity of molasses or other sweetening you use in home baking. Cravings for very sweet foods are caused by mineral and vitamin deficiencies. As these are addressed, people start to be able to taste and enjoy foods which are less sweet. Oats are a much better choice than wheat if you want to avoid upsetting blood sugar balance as oat fibre slows digestion down, keeping you fuller for longer. Nuts/seeds also help delay the release of sugars (from grains, fruit and molasses) into the bloodstream. This helps balance blood sugar levels to help energy levels, brain function and immunity. This recipe is free of harmful refined vegetable oils. Virgin coconut oil is a useful source of medium chain triglycerides , that are used by the body directly to make energy instead of being stored as fat. The oils in the sesame seeds, although damaged by heating, cannot be absorbed by the body as whole sesame seeds are not digested (they are too small so pass through and out the other end intact!). As I mentioned before, you could avoid adding the pumpkin seeds and sunflower seeds until the end to boost the nutritional value of these bars further. Raw nuts and seeds contain beneficial omega 6 oils.
Aug 28, 2013 | Anna's Best Recipes, Packed lunches
As its almost the start of the school year I got thinking about kid’s lunchboxes and how to make them better to help learning, behaviour and mood. Here’s my quick 5 point guide to breads & wraps, sandwich fillings and fork lunches, ready made lunches and sweet stuff. Start with small changes so there’s less chance of lunchboxes coming home uneaten. It helps if you are also making changes to breakfasts and family meals to better support health and vitality. Research shows that when children get involved in the preparing of food, they eat it much more willingly. So if there’s any chance you could involve your child in making, say a wholemeal pasta salad, or helping you mash a sandwich filling on a Sunday before the start of the school week, that could be a winner…
1. Switch to wholegrains
Making the change from white sliced pan to brown could be as simple as starting with a sandwich made with a slice of brown on the bottom, and a slice of white on the top layer. Try a halved brown pita bread instead of white for a handy pocket into which to stuff fillings. If you like to cook, get my basic sandwich wrap off this blog and make a few to store in the fridge or freezer. Wholegrain crackers such as Nairn’s rough oatcakes or miniature oatcakes are a winner too, if your child prefers something dry. And remember, any slightly unusual ingredients are to be found on the “larder and shopping” section of this blog.
2. Add high quality, protein-rich fillings for your wholemeal bread, wrap, pita or pasta/rice base
The following will support long-lasting energy and learning after lunch.
- Mashed drained, tinned salmon mixed with a little chopped cucumber. Salmon is full of brain-enhancing omega 3 oils to help learning and mood
- Light Philadelphia, fresh ricotta (even sweeter and better for you), or cottage cheese blitzed in the food processor (to get rid of lumps) mixed with some finely chopped cucumber and sweet red peppers
- Make a creamy tuna filling by mixing 1 dessertspoon of extra virgin olive oil with 3 spoons of natural yoghurt in a bowl to make a sauce. Mix together a drained tin of tuna (tinned in brine or spring water rather than oil), some finely chopped cucumber and a de-seeded chopped tomato and maybe a little finely chopped red onion. This well depend on what your child likes. Add in enough of the sauce to bind it all together. If your child can’t stand lumps, leave out the veggies and try them as maybe a few cucumber sticks or carrot sticks on the side.
- Leftover cooked chicken or beef, shredded or sliced, with the same sauce/veggies as above or mixed with red pesto, a little extra virgin olive oil, and the veggies.
- You can also mix the tuna, cheese or chicken with leftover wholemeal pasta shapes and put into a box for an older child to eat with a fork.
- On a Sunday or a day off, take 5 minutes with your kids to make my ultra easy chickpea salad or my super quick butter bean salad – stuff into a wrap or wholemeal pitta or add some cooked leftover brown rice, brown pasta, quinoa or millet for a fork lunch. If your kids get involved, they are 100% more likely to eat the results!! These lunches are incredibly good value and fantastic for learning and mood as beans and pulses are rich in magnesium.
- Buy some wooden kebab sticks in the supermarket or Asian shop. Cut up bite size pieces of cucumber, sweet red/yellow pepper, cherry tomatoes, and bought-in felafels (chick pea patties from health stores or Halal shops) or pieces of cooked chicken. Thread on the sticks. If you end up with a bit more time, make up a spicy sauce from half a cup of natural yoghurt mixed with a little crushed garlic for older children to dip the kebabs into and put in a little plastic container in the lunchbox.
3. Even shop-bought lunches can be better quality
All the ideas below contain high quality protein for sustained energy and learning:
- A whole tub of shop bought humous, a cellophane-wrapped pack of Nairn’s rough oatcakes, some vegetable sticks and a couple of mandarins, plums (for older children) or an apple. Surprisingly, raw red peppers, carrots, cucumber, even celery are more appealing to kids than limp cooked veg! – start with one or two in the lunchbox, don’t comment if it comes back uneaten, just keep putting it in – this approach often yields results)
- A tub of 3 bean salad from the supermarket deli counter or a bean-based salad from M&S, a piece of fresh fruit, plus and maybe a brown roll/bread for bigger appetites
- For real emergencies, have a stash of John West Light Lunches in the cupboard for an older child with a bigger appetite. These are next to the tinned fish in supermarkets. The best choice is the Mexican style tuna salad because it contains beans instead of white rice. A piece of fresh fruit alongside makes an OK lunch thats very tasty. These even come with a handy fork.
5. Something sweet
If your child is really not content with a piece of fruit as their something sweet, then some of the following are healthier alternatives to sweets and sugary snacks. Bear in mind that for high quality sweet treats you need to spend either time or money. Expensive ingredients cost more to manufacturers than cheap low quality ones. In the next few weeks I will be putting up some recipes for flapjacks and bar.. Just enter your email in the side bar this blog to get notified when I post a new recipe. Here are a few ideas to get you started:
- Baby Organix biscuits and munch bars from supermarkets – these are sweetened with fruit juice instead of sugar.
- Nak’d Bars from health stores are fantastic quality
- Fruitas bars from health shops are good too
- Home-made flapjacks sweetened with raw cane molasses or xylitol instead of regular sugar and using wholemeal flour instead of white. I will be posting some flapjack recipes in the coming weeks.
- 1-2 dried no-soak dates from the supermarket
- 1-2 unsulphured apricots from the health stores for a chewy burst of sweetness
- A few sundried banana chips from health stores or Dublin Food Co-Op (see larder section of this blog for Coop details)
Aug 23, 2013 | Anna's Best Recipes, Cakes, biscuits & bars
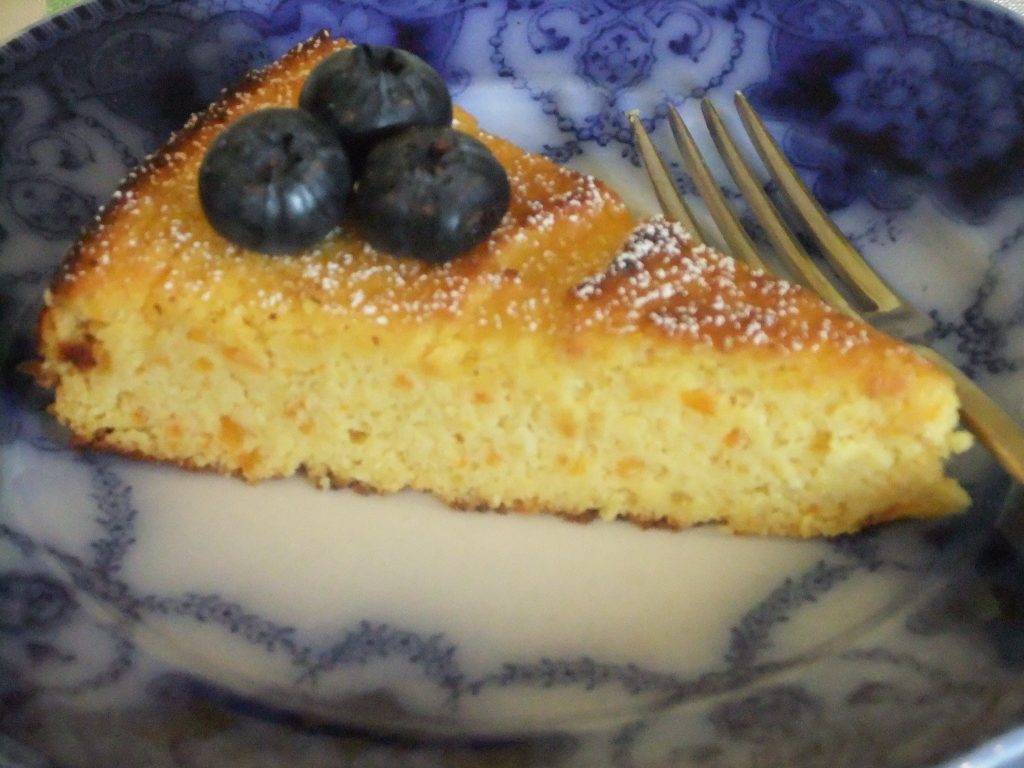
This is a pretty easy and deliciously moist cake which I made last weekend. Serve as an afternoon tea cake or as a dessert with a fresh orange and blueberry fruit salad and/or (if you eat dairy) a blob of natural Greek yoghurt.
For one 23cm round cake to serve 6-8
2 medium oranges – organic and unwaxed
3 eggs, separated
120g Xylitol
150g ground almonds
1 level tsp gluten-free, aluminum-free baking powder
Check out my “larder & shopping” section for where to buy unusual ingredients
1. Place the clean, whole, and unpeeled oranges in a pan with enough water to cover. Bring to the boil, cover with a lid and simmer for about one and a half hours or until soft, adding more water if necessary (you can do this in a pressure cooker in half the time – just half cover the fruit with water).
2. Drain the oranges and cut them into quarters, discarding any major pips. Put the orange pieces, including the peel, in the food processor and blend to a pulp. Leave to cool.
3. Beat the egg yolks and the xylitol in a large bowl until light and fluffy. Beat in the orange pulp, almond, and baking powder. In a separate bowl, beat the egg whites until they form soft peaks, then gently fold into the orange mixture.
4. Preheat the oven to 175C/160 fan/gas 4. Lightly oil and line a 23cm round loose-bottomed cake tin or rectangular loaf tin with greaseproof paper.
5. Bake for an hour, until golden and firm to the touch. Turn out carefully and store in an airtight container in the fridge for up to 5 days.
Why this recipe is better for you:
Foods cooked at over 120C are less good for you than foods cooked at low temperatures. However, this cake is still better for your body than most bakery goods which contain toxic refined oils, sugar and white flour. Because the cake contains protein from the almonds, it’s low GI. This means it won’t upset blood sugar levels and cause fluctuations in energy or mood or stress levels. Xylitol is a tooth-friendly and healthier alternative to sugar. Because non-organic oranges are covered in pesticides and chemical-containing preservative waxes, their skins contain harmful chemicals. Boiling the fruit and discarding this water should make the skins safer to eat. The ground almonds in this cake do not count towards your daily intake of healthy, raw omega 6 oils as they have been heated to a high temperature and lose their beneficial properties.
Aug 23, 2013 | Anna's Best Recipes, Breads, crackers, pancakes & wraps, Breakfasts & smoothies, Main courses
Ate these last Sunday for a late and leisurely breakfast. If you have ever successfully made ordinary pancakes, these will be a doddle for you. Buckwheat galettes are a traditional pancake made in Brittany and eaten with savory fillings. They are naturally gluten-free. If you want, you can store them in the fridge for 1 day, or freeze them for up to one month. When freezing, separate them with greaseproof or baking paper and store them in a self-seal bag to prevent drying out. To serve made-in-advance galettes hot, add one at a time to a dry frying pan, when the first side is hot, flip over. This recipe makes 4 large galettes. to make this a balanced lunch or dinner, simply add a large salad or steamed green vegetables drizzled with olive oil.
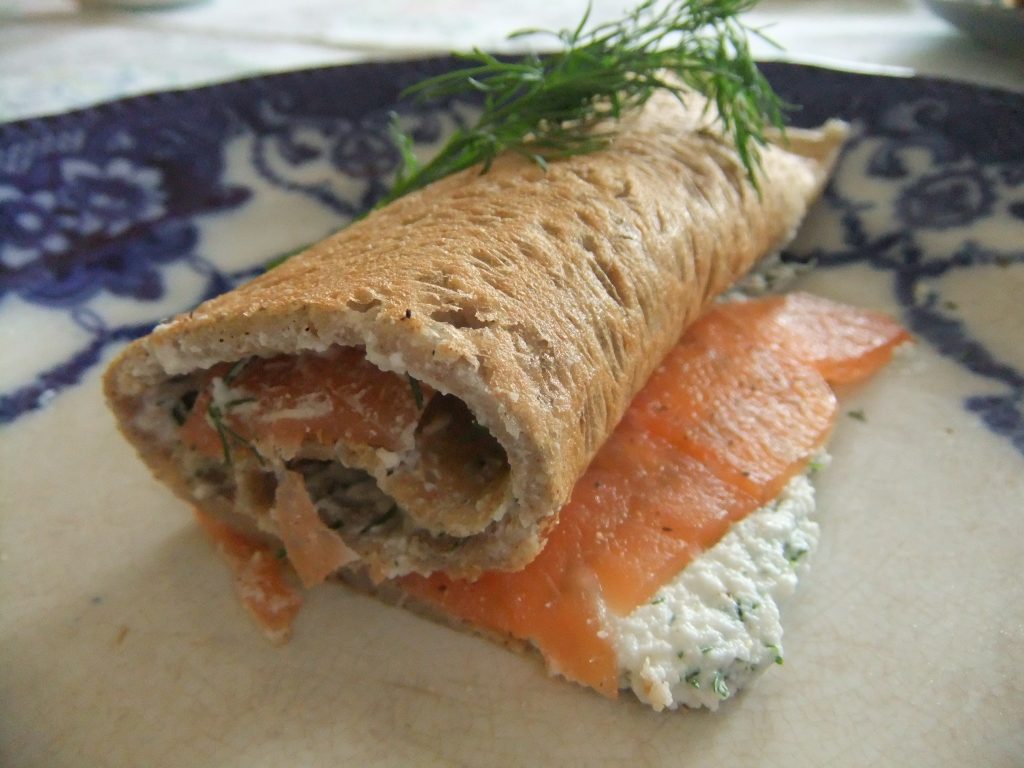
Buckwheat pancake with ricotta, dill & smoked salmon
For 2 piggy eaters (or 4 normal appetites!)
100g buckwheat flour (for unusual ingredients see larder section)
1 large egg, organic if possible
300ml/ ½ pint liquid – use 150ml/ ¼ pint each water and milk (rice milk, cows milk or soya milk or oat milk – NB oat milk may contain gluten) or use all water. See larder for further info.
A little virgin macadamia oil, coconut oil, or, if you can’t get these, some extra virgin olive oil
Freshly ground black pepper
100g smoked salmon, ideally wild or organic
1 small tub (150-200gg) buffalo or cow ricotta cheese (if you can’t get this, use low-fat cottage cheese, mashed or blitzed in a processor until smooth-ish in texture)
2 tbs chopped dill herb (a small bunch should be enough to yield this quantity)
1. Sift the flour into a large bowl.
2. Make a well in the middle and break in the egg and add a few grinds of black pepper.
3. Using a whisk, gradually add the liquid, whisking well, until the mix has the consistency of thin cream. Depending on the size of the egg, you may need a little more or less fluid than the quantity specified. Like all grain-based foods, buckwheat becomes more digestible if you leave it overnight to soak before cooking.
4. Heat a flat-based frying pan or griddle until hot, wiping a little oil over it with kitchen paper while it is still quite cool (macadamia oil, coconut oil, or extra virgin olive oil are fine)
5. When hot, pour a quarter of the mixture into the centre of the pan, tilting the pan to spread the mixture. Cook for a minute or two, until the pancake, begins to bubble around the edge. Flip it over with a spatula and continue cooking for another minute or two.
6. When the galette is cooked, turn it on to a plate, keep warm in the oven (covered with another plate to keep it all moist) and continue making more and piling them up.
9. To serve, mix the ricotta in a bowl with 2 tbs chopped fresh dill. Cut the salmon into strips and layout on a plate. Give each person a galette and allow them to add the cheese and fish and roll or fold before eating. Yum!
Variations:
Heat up some leftover chickpea curry, bean-based vegetarian curry, chili, or a casserole to use as a filling for these galettes.
Why this is good for you:
Buckwheat flour is a grain that is naturally gluten-free and is packed with nutrition. It is a valuable source of rutin, a bioflavonoid with anti-inflammatory and immune-balancing properties. Rutin, like many other bioflavonoids, helps support the integrity of your skin, making it stronger and less prone to allergic reactions. Ricotta is a cheese made from the watery whey skimmed off after making cheese. Because it is low in casein (the main milk protein that people can be intolerant to), its less likely to be a problem for those with a mild dairy intolerance. Smoked salmon is a high-quality protein that’s packed with essential omega 3 fats. The high protein content of this meal will keep you fuller longer.

 is amazing!! I adapted it from Nigella’s recipe based on traditional dairy cream, which isn’t tolerated well by many dairy-sensitive people. I’ve been working for some time on a dairy-free version of cream and now I think I’ve cracked it – the result has that lovely “mouth-feel” and thickness you get from whipped cream and it’s really good for you too. The straining of the rhubarb and boiling down of the liquid to a syrup means that when you eventually fold everything – rhubarb, cream, syrupy juice – together, you can get a lovely swirled effect. Use the rosiest, pinkest rhubarb you can find. I couldn’t get pink rhubarb so I got a pink colour by mashing and straining a cupful of thawed freezer raspberries to give me 25-30ml of puree. Alternatively, use a few drops of cochineal*, a natural pink food colouring, to make the rhubarb pink. If achieving the pink colour is too much of a faff, don’t bother…
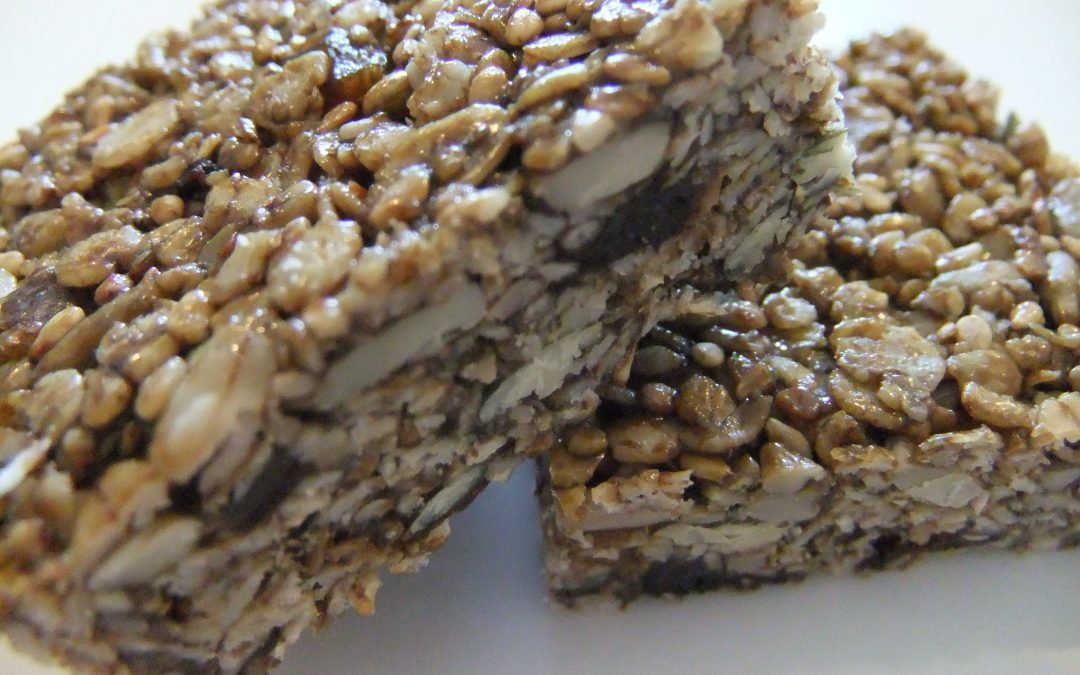